
If you receive a lot of spam or phishing emails in your inbox, you can delete them easily and effectively using a mix of Microsoft 365 tools and PowerShell. In this article, we will show you how to create a content search to find all suspicious emails, and then how to permanently remove them using the Security and Compliance PowerShell module.
This is more of a tutorial on how to fix an ongoing issue to prevent spam from spreading to more people. It can also be used to proactively delete spam if some gets reported by internal users or if you receive some yourself. BE CAREFUL, there is no way to recover emails deleted by following this documentation (excluding backed up solutions). So go slowly, take your time and everything will be fine!
To follow the steps below, you will need a global administrator account or an account with access to Microsoft Purview. This documentation can be followed to add the required permissions for a user account. The important role for a user to have is “Search and Purge” whi can be obtained by giving them the Purview role “Organization Management“. This role gives a lot of access, so a custom role can be created if needed.
Microsoft 365 admin center roles might be needed for the specified users, including “Compliance Administrator“. The requirements will vary based on company policies and the roles given to different teams.
Creating a content search
There are two ways to create a content search, the first one using the GUI should be easier for most people, the second one involves PowerShell and is definitely faster.
Using the GUI
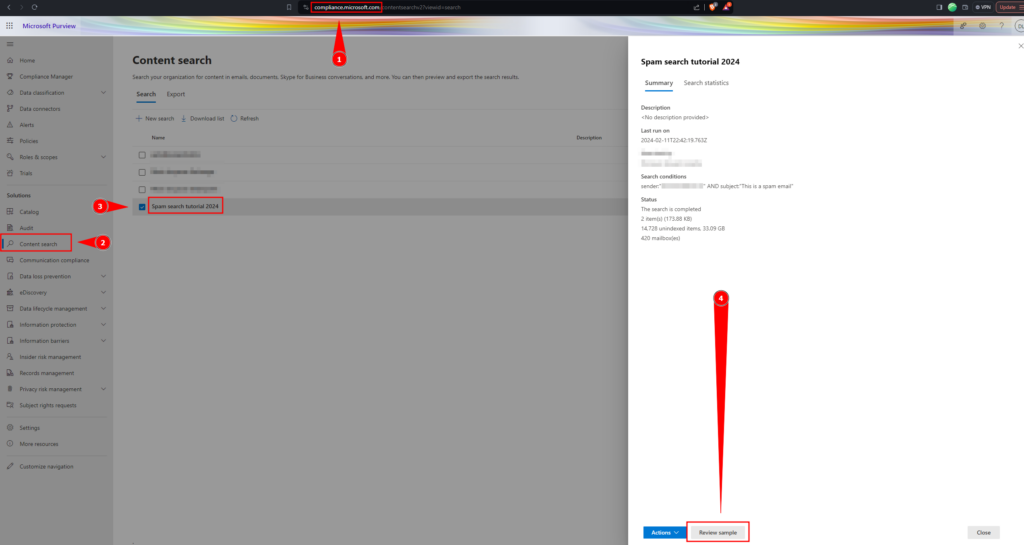
- Access the Security & Compliance Center: Navigate to the Office 365 Security & Compliance Center (Microsoft Purview)
- Navigate to Content Search: Once you’re in the Security & Compliance Center, look for the ‘Solutions’ section in the left-hand menu and click on ‘Content search’.
- Create a new search: Click on the ‘+ New search’ button then name it.
- Define your sources: In our case, we want to find emails so we select Exchange Mailboxes as our location and include everything

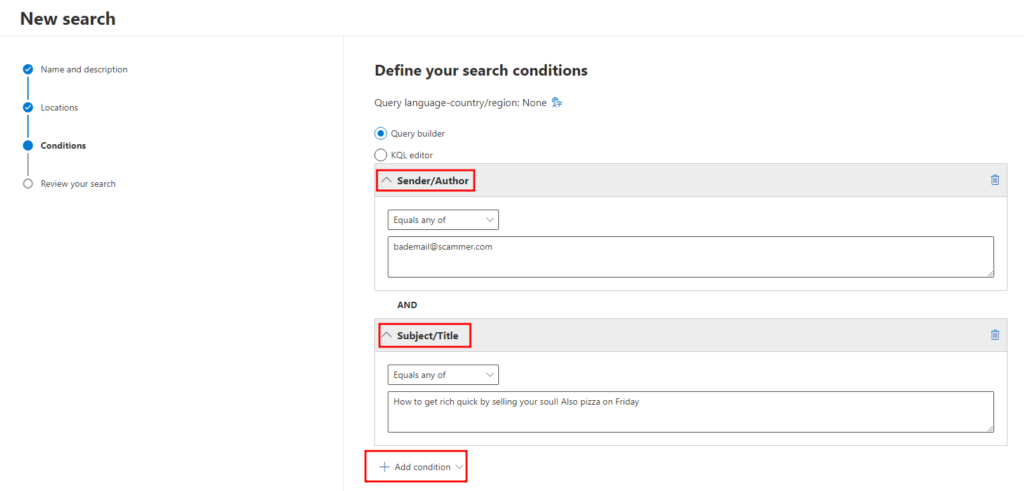
- Define your search parameters: On the “Conditions” page, replace the default condition for a “Sender/Author” and a “Subject/Title” condition.
- Start the search: Click on ‘Search’ to start the content search. The system will now search through all mailboxes and public folders for emails that match your defined parameters.
- Review the search results: Once the search is complete, you can review the results to ensure that the emails found are indeed spam or phishing emails. Remember, the deletion of emails is irreversible, so it’s important to verify the emails before proceeding to the deletion step.
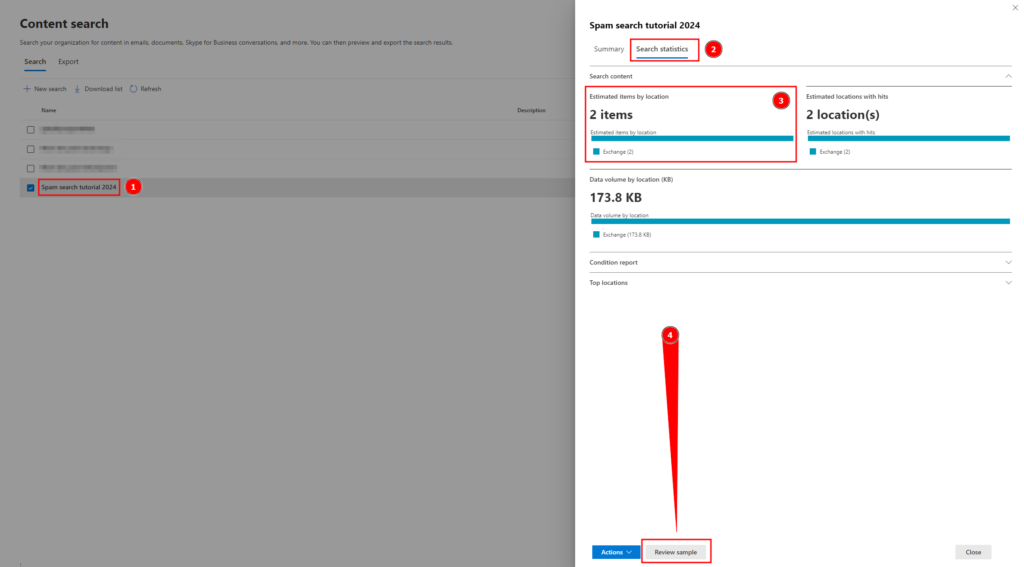
- Simply click on the created search (once it indicates “Finished” under the “Status” column). You should be able to see right away if many emails were found. The information is under the “Search Statistics” tab. The “Unindexed items” are not included in the actual results but you should review a sample anyways.
- Then choose actions at the bottom of the newly opened panel and click “Review Sample”
- Note that the sample might take a minute to load.
Using PowerShell
To run a compliance search using PowerShell instead of the GUI and make sure only the desired spam emails are getting caught in the search, follow the steps below. Skip this section if the search was done through the GUI using the last section.
- Log in to the Security and Compliance PowerShell module. To do this, you must install the Exchange Online module (EXO V2) from PowerShell Gallery
- Import the module by running the following command:
Import-Module ExchangeOnlineManagement- Log in using your administrator email address with the following command (Adjust to your needs):
Connect-IPPSSession -UserPrincipalName "administrator email"- Use the New-ComplianceSearch cmdlet to launch a search on all mailboxes by giving it a name and filtering with the “Subject” and “from:” fields of the email.
PS C:\WINDOWS\system32> New-ComplianceSearch -Name "Spam search tutorial 2024" -ExchangeLocation All -ContentMatchQuery 'sender:"[email protected]" AND subject:"This is a spam email"'

Name                      RunBy JobEndTime Status
----                      ----- ---------- ------
Spam search tutorial 2024 NotStarted- Once the search is created, start it using the command below, replacing the identity with the name you gave your search in the previous step: New-ComplianceSearch -Name “Spam search tutorial 2024”
PS C:\WINDOWS\system32> Start-ComplianceSearch -Identity "Spam search tutorial 2024"- Check the status of the search with the follow command, replacing the identity with the name you gave your search 2 steps above: New-ComplianceSearch -Name “Spam search tutorial 2024”
PS C:\WINDOWS\system32> get-ComplianceSearch -Identity "Spam search tutorial 2024"

Name                      RunBy                   JobEndTime Status
----                      -----                   ---------- ------
Spam search tutorial 2024 Admin Starting- Preview the results by going to the newly-created content search on the Microsoft Purview admin center. There is currently no convenient way to display a preview of the results through PowerShell and this last check is always recommended.
Deleting the Items
After the search is completed and you confirmed only spam has been included, we can proceed with the deletion of those emails.
- Log in to the Security and Compliance PowerShell module. To do this, you must install the Exchange Online module (EXO V2) from PowerShell Gallery
- Import the module by running the following command:
Import-Module ExchangeOnlineManagement- Log in using your administrator email address with the following command (Adjust to your needs):
Connect-IPPSSession -UserPrincipalName "administrator email"- Delete the messages by running the following command (Adjust to your needs):
Warning (And reminder): this method is irreversible and should only be used if you are sure that the messages found are those you want to delete. To avoid errors, you can preview the content of messages before deleting them by selecting your content search on the Security & Compliance Center and then clicking “Review Sample.” After a minute or two, you will then see the details of the messages and you can check that they match the criteria you have defined.
New-ComplianceSearchAction -SearchName "Name of the search created in the previous step" -Purge -PurgeType HardDelete- To verify that the deletion is complete, run the following command. Note the addition of _Purge to the end of the search’s name (Adjust to your needs):
Get-ComplianceSearchAction -Identity "Name of the search created in the previous step_Purge"- Once finished and after verifying that the messages have been deleted, remove the delete action that was just created with the following command. Note the addition of _Purge to the end of the search’s name (Adjust to your needs): :
Remove-ComplianceSearchAction -Identity "Name of the search created in the previous step_Purge_Purge"Cleaning up
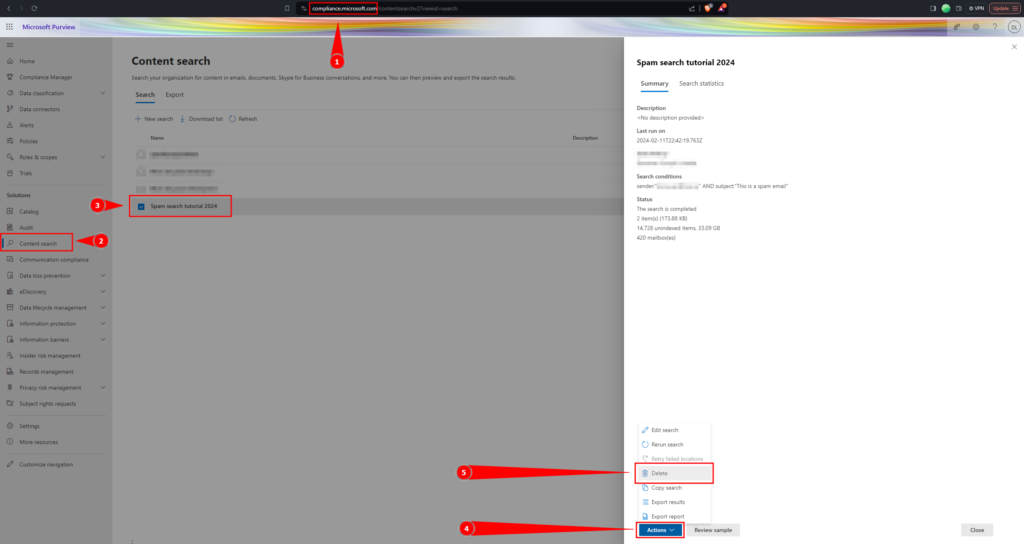
One everything has been deleted and the threat has been neutralized, it is recommended to delete the created search actions from the Purview admin center simply by opening the search and deleting it through the “Actions” menu.
All Good
By following these steps, and after some practice, you will be able to quickly delete all copies of spam in Microsoft 365 in minutes. We hope this article was useful to you and will save you from a few headaches in the future.