If you have a WordPress website running on a docker container and you want to migrate it to a new docker host, you might be wondering how to do it without losing any data or breaking anything.
We have personnally had issues recently with a couple servers because of updates and one of them contained a couple sites. We tried multiple methods, including transferring docker volumes (tarred/zipped), using custom containers to capture and transfer the data and multiple plugins to do the transfer. We ended up getting everything transferred with UpdraftPlus, a popular WordPress backup and restore plugin. The free version should do everything we need in this scenario. This article is not sponsored.
Why would you need to migrate your WordPress website?
There are many reasons why you might want (or, sadly, need) to migrate your WordPress site to a new docker host. For example:
- An operating system (or hypervisor) upgrade caused issues.
- You want to switch to a different cloud provider or hosting service that offers better performance, security, or features.
- You want to scale up or down your docker host according to your website traffic and resource needs.
- You want to test your website on a different environment before deploying it to production.
- You want to create a backup or clone of your website for development, testing, or troubleshooting purposes.
Whatever the reason is, migrating your WordPress website from a docker container doesn’t have to be challenging. It can be nice to not need any special tool or plugin to complete a task, but they can make your life so much easier. You need to make sure that you copy all of the files and databases of your website, as well as the configuration and settings of your docker container, without causing any errors or conflicts.
Why is docker a good choice for running WordPress websites?
Docker is a software platform that allows you to create and run applications using containers which are isolated environments that contain everything an application needs to run, such as code, libraries, dependencies, and configuration. Containers are lightweight, portable, and scalable, which makes them ideal for running WordPress websites.
Some of the benefits of using docker for WordPress websites are:
- You can run multiple WordPress websites on the same docker host, each with its own container, without affecting each other.
- Always remember to follow best practices when it comes to security and running containers as a root user.
- You can easily deploy, update, and manage your WordPress websites using docker commands or tools like docker-compose.
- You can use pre-built images from the official WordPress repository or create your own custom images with the plugins and themes you need.
- You can leverage the power and flexibility of docker networking and storage to connect your WordPress websites with other services and resources in separate isolated docker networks.
How to use UpdraftPlus to migrate your WordPress website from a docker container?
In this scenario, we are transferring a website with a custom theme, multiple plugins for security, ads, cookies, etc. and multiple pages, posts and drafts.
To use UpdraftPlus to migrate your WordPress website from a docker container to a new docker host (or wherever you desire), you need to follow these steps:
- Update your WordPress site. For the transfer to be successful, it’s important to remove as many variables as we can. Updating your WordPress site to the latest version will make sure that both the source and destination sites run on the same base.
- Use best practices for the update and either have a backup ready or have a way to roll-back the update. A good idea would be a virtual machine snapshot or using your hosting provider’s backup solution, if present.
- Otherwise, steps 2 to 4 below explain how to take a backup of the site with UpdraftPlus. It might still be a good idea to do that now as a simple safety precaution. A new backup can then be taken after the update to make sure the source and destination websites’ versions match. Better be safe than sorry!
- Install and activate UpdraftPlus on both the source site and destination site. The source site is the site you want to copy/migrate. The destination site is the site you’re migrating to. You can install UpdraftPlus from the WordPress plugin directory or download it from the official website.
- Start with opening the “Plugins” menu from WordPress’ sidebar
- Click “Add New Plugin” at the top of the page or on the left navigation bar
- Search for UpdraftPlus, click “Install Now” followed by “Activate”

- Choose a remote storage location in the source site (optionnal but recommended now and for future backups). Go to Settings (Left WordPress navigation bar) > UpdraftPlus Backups > Settings and select one of the remote storage options available.
- We recommend copying directly to a cloud storage provider (OneDrive, Google Drive) or directly to another server (FTP). Copying to emails is can become problematic if your email provider blocks emails of a certain size or blocks the receival of multiple emails in a row (Each data category [Database, Plugins, Themes, Uploads and Others] is a separate email.
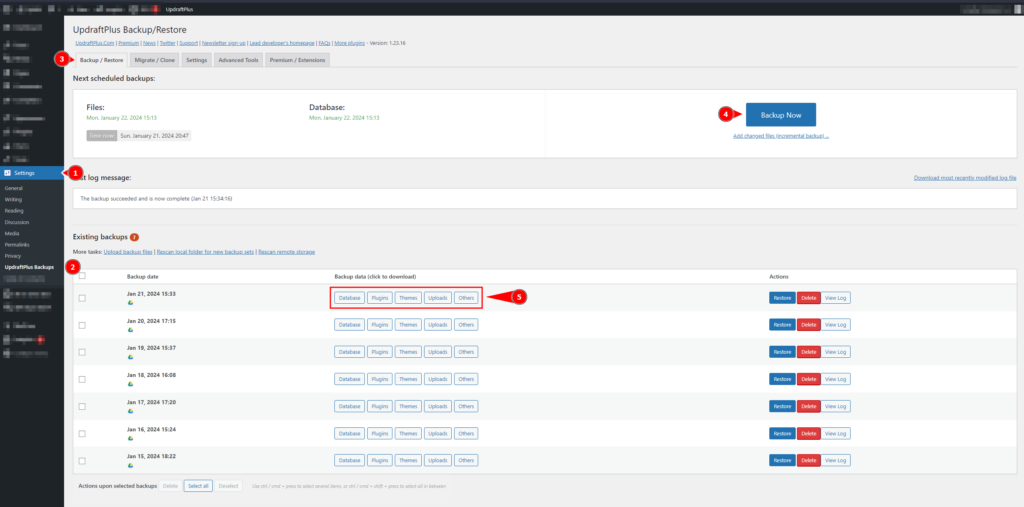
- Take a backup of the source site. Go to Settings > UpdraftPlus Backups > Backup / Restore and click on Backup Now. A progress bar will show you the status of the backup process. Once the backup is complete, you should see it listed under Existing Backups.
- The files will be available on your remote storage location, if configured. Otherwise, they can be downloaded by clicking on each category below
- Install WordPress on the destination host. this assumes the source WordPress site had been updated to the latest version. If that is not the case, the transfer could still work, but it introduces more variables which may cause issues right away or in the long term.
- Open the destination site and connect it with the same remote storage location as the source site. Go to Settings > UpdraftPlus Backups > Settings and select the same remote storage option as before. You need to authorize UpdraftPlus with the remote storage location by following the instructions on the screen.
- Restore the backup of the source site on the destination site. Go to Settings > UpdraftPlus Backups > Backup / Restore and scroll down to Existing Backups. You should see the backup of the source site that you made earlier. Click on Restore next to it. A wizard will guide you through the rest of the migration process. You need to select what components of the backup you want to restore, such as plugins, themes, uploads, database, etc. Click on Next and then Restore to start the restoration process.
- If that is not the case, there are multiple options.
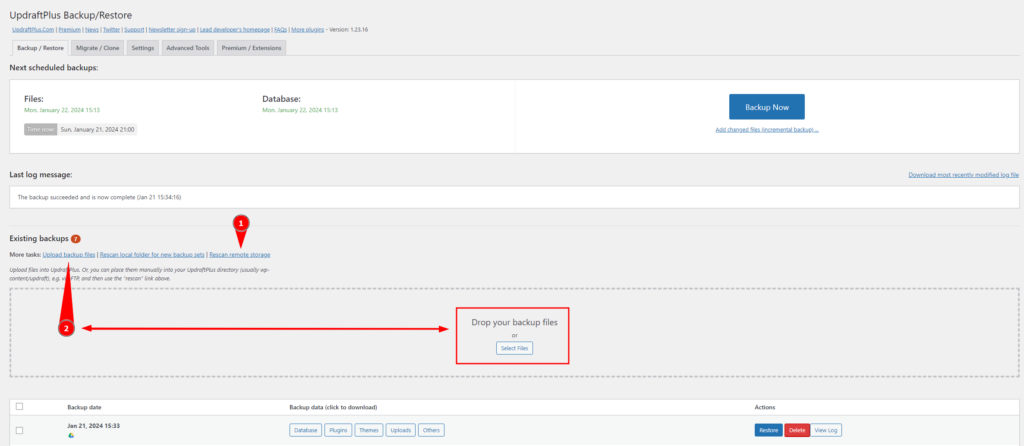
- The first one is to scan the remote storage for the backup files which should transfer them automatically. (See option 1 on the image below)
- The second is to Upload the backup files manually. Download them from your remote storage location, click “Upload backup files” (Option 2 below), then drag-and-drop them on the UpdraftPlus window.
- If that is not the case, there are multiple options.
- Once the restoration is complete, you should see a success message on the screen. You can now visit your destination site and check if everything is working as expected. Remember, because your source site’s database has been migrated, the sign-in credentials for your destination site will no longer work and you’ll need to use the ones from your source site to login.
You should now be able to confirm everything is in order and proceed to move your traffic to your new WordPress instance. Enjoy!