Microsoft Word is one of the most popular and powerful word processors in the world, but it also has some lesser-known functionalities. Here are five Microsoft Word Features that can make your work easier and more efficient. All of these are easy to find and easy to use, but most of us just don’t know they exist, or maybe we simply don’t realize how much of a timesaver they can be.
Dictate your text
If you don’t feel like typing, you can use the Dictate feature to speak your words and have them transcribed automatically. To use it, go to the Home tab, click on the microphone icon (1), and start talking. You can also use voice commands to add punctuation, formatting, and symbols.
When talking, Word will try to understand the perfect place to put punctuation, including commas and periods. You also have the option to say “Period” or “Comma” to force it. We found the feature to be pretty accurate, but not without its mistakes. Those were, however, not frequent enough to make it a slower experience than typing, especially for moments when we simply want to draft some ideas quickly.
Extra feature: Transcription
The transcription feature can be accessed through the same menu as the dictation feature and can be highly valuable for interviews and meetings.
This tool can either translate live or from an audio file, it will identify different speakers and write on the page what everyone is saying, separating the different people. We would suggest testing this feature on each computer or microphone individually, especially if it is to be used on a laptop. They often have poorer quality microphones which might make it difficult for a computer to differentiate different voices.

Translate your documents
If you need to work with a document in a different language, you can use the Translate feature to convert it to your preferred language. To use it, go to the Review tab, click on Translate then select “Translate document”, and choose the languages you want to translate from and to. You can also translate selected text or words by right-clicking on them and choosing Translate.
Insert icons and 3D models
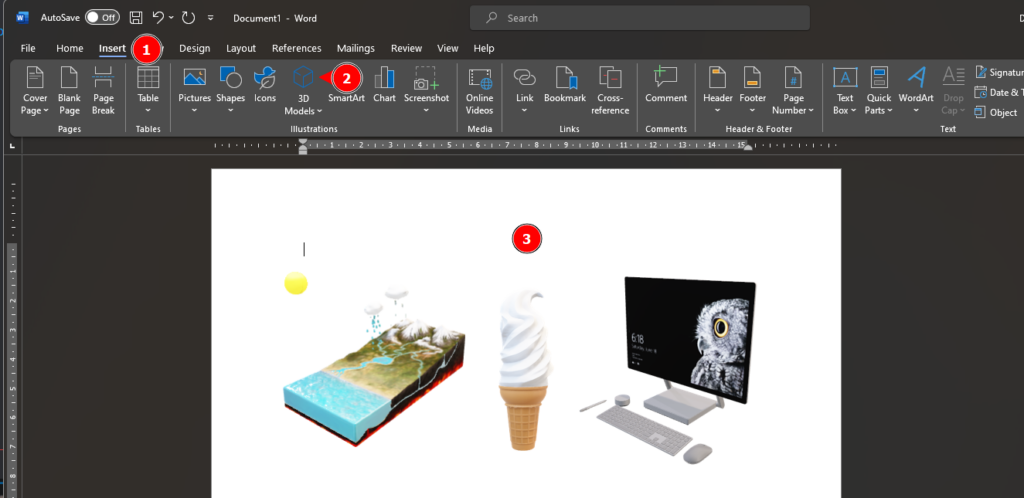
If you want to add some novelty to your document or add a fun touch of uniqueness, you can use the “Icons” and “3D Models” features to insert various shapes and objects. To use them, go to the Insert tab, click on Icons or 3D Models, and browse through the categories. You can also resize (like a normal image), rotate (by clicking on the model, then dragging the multi-directional wheel that appears in the middle).
You might be surprised by the amount of content Microsoft has decided to put in this less known feature. The models contain everything from animated educationnal models to ice cream and even most of Microsoft’s product lineup.
More advanced users can try and play with some of the 3D models’ properties by adjusting the shadows, lighting and more. Simply right-click on the shape you want to modify then select “Format 3D model”. A new panel will open on the right with all of the adjustment available.
Use Smart Lookup to quickly browse the internet
If you need to research something related to your document, you can use the Smart Lookup feature to access information from the web without leaving Word. To use it, select the text or word you want to look up, right-click on it, and choose Smart Lookup or the option named “Search <word>”. A sidebar will open with relevant results from Bing, Wikipedia, and other sources.
It can be a good way to quickly find information about a program, a person or simply an unknown word.

Recover unsaved documents after a crash or a restart
If you accidentally close Word without saving your document, or if Word crashes unexpectedly, you can use the Recover Unsaved Documents feature to restore your work. To use it, go to the File tab, click on Open, and then click on Recover Unsaved Documents at the bottom of the page. You will see a list of files that were not saved properly, and you can open and save them as usual.
Important note concerning unsaved documents
Word also allows documents to be recovered directly after a crash. A window should open in Microsoft Word, on the left side of the screen, after a crash. It is extremely important that you click on each and every document that you want to recover (then save them individually) before closing that side window. Once it is closed, Word will delete its internal copy of your recovered documents and you will not be able to recover them. It can be confusing and a source of stress for anyone quickly closing that panel.
Hopefully some of these features will be useful to you. You might have known about some of them, but a quick refresher can always be useful!
Very useful thanks!
awesome!