
This guide will explain how to install Coolify, a tool for deploying Dockerized applications with minimal intervention and how to have them be hosted behind a reverse proxy allowing us to have HTTPs connections to those services. This is going to be done on an Ubuntu 24.04 server (see the list of supported operating systems here) and will be configured to use Cloudflare’s API for automatic SSL certificate management. We’ll also cover some common customizations to enhance quality of life, easeof use and performance.
While this example uses Cloudflare, the principles can be adapted to other ACME providers (see Traefik documentation for a full list here). This documentation explains which variables need to be used in the “environment:” area of the proxy configuration inside Coolify. The instructions will vary depending on your provider.
Prerequisites:
- A Ubuntu 24.04 server (with SSH access preferably and ports opened to your provider’s IP addresses).
- A registered domain name which is either fully managed through one of the supported providers or has its DNS configured through one (e.g.,
local.bytiful.com).- It’s important to note this will not work with every provider, for example, if your DNS provider is GoDaddy, you are unlikely to be able to continue since GoDaddy enforces high minimum requirements defining who is allowed to automatically generate ACME (HTTPs) certificates through their services. In this case, it would be possible to transfer your domain’s DNSs to Cloudflare (or another provider)
- If that is the case, you can follow this guide on Cloudflare’s website detailing how to transfer your domain’s management to Cloudflare. Your billing and purchases will still be done through the original provider, but your domain will be managed on the Cloudflare dashboard.
- It’s important to note this will not work with every provider, for example, if your DNS provider is GoDaddy, you are unlikely to be able to continue since GoDaddy enforces high minimum requirements defining who is allowed to automatically generate ACME (HTTPs) certificates through their services. In this case, it would be possible to transfer your domain’s DNSs to Cloudflare (or another provider)
- A Cloudflare account and API token with appropriate permissions (This will be explained later)
- In the case of other providers, you might need different things, see the list of supported providers on Traefik’s website and the required data
Installing Coolify
First, create a virtual machine running one of the supported operating systems (Ubuntu 24.04 Server in this case), then run the following script from coolify’s documentation to install it automatically:
curl -fsSL https://cdn.coollabs.io/coolify/install.sh | sudo bashThis script will download and run the Coolify installer. Follow any on-screen prompts during the installation process, you can then access your server at “http://private-server-ip:8000”
For more detailed instructions, see the installation guide on Coolify’s website
Create your Cloudflare API token
This is where your installation might differ, if you’re using a different provider than Cloudflare, you will need to look at the traefik documentation for your provider and figure out what you need exactly. In general, traefik needs permission to connect to your provider, normally through an API token, to be able to edit the DNS data. This will be shown with Cloudflare, but may apply similarly to other providers.
- Login to your Cloudflare dashboard
- https://dash.cloudflare.com/
- Head to “Manage accounts” in the left navigation bar, then click on “Account API Tokens“
- Click on “Create Token” to create an API key
- Click on “Edit Zone DNS” or “Create Custom Token” to get started, the result will be the same at the end

- Configure the following settings to allow Traefik to Edit the DNS zone, which will be required for our proxy to be able to generate new certificates with a DNSChallenge, which proves to Cloudflare we own our domain
- Optionally allow the API key to access a specific Resource (a specific domain)

- Remember to rename your token to something you will remember (for example: Coolify Reverse Proxy)

- Click on “Continue to summary” at the bottom of the page, then click “Create Token“
- Make sure to note down the token, since once you leave the page, it will never be shown again
Configuring Traefik with Cloudflare Integration:
Coolify uses Traefik as its reverse proxy. The default configuration can be customized to suit your needs.
- After the installation, open Coolify’s web interface to create your administrator account. The interface should be available at: http://your-server-ip:8000/
- Navigate to the “Servers” tab on the left => click on “localhost” => “Proxy“
- Some things have to be changed from the default configuration
Replace the contents of coolify-proxy with the following configuration:
name: coolify-proxy
networks:
  coolify:
    external: true
services:
  traefik:
    container_name: coolify-proxy
    image: 'traefik:v3.1'
    restart: unless-stopped
    extra_hosts:
      - 'host.docker.internal:host-gateway'
    networks:
      - coolify
    environment:
      - CF_DNS_API_TOKEN=12345678123456789123456789132456789123456798
    ports:
      - '80:80'
      - '443:443'
      - '443:443/udp'
      - '8080:8080'
    healthcheck:
      test: 'wget -qO- http://localhost:80/ping || exit 1'
      interval: 4s
      timeout: 2s
      retries: 5
    volumes:
      - '/var/run/docker.sock:/var/run/docker.sock:ro'
      - '/data/coolify/proxy:/traefik'
    command:
      - '--ping=true'
      - '--ping.entrypoint=http'
      - '--api.dashboard=true'
      - '--entrypoints.http.address=:80'
      - '--entrypoints.https.address=:443'
      - '--entrypoints.http.http.encodequerysemicolons=true'
      - '--entryPoints.http.http2.maxConcurrentStreams=250'
      - '--entrypoints.https.http.encodequerysemicolons=true'
      - '--entryPoints.https.http2.maxConcurrentStreams=250'
      - '--entrypoints.https.http3'
      - '--providers.file.directory=/traefik/dynamic/'
      - '--providers.file.watch=true'
      - '--certificatesResolvers.cloudflare.acme.dnschallenge.provider=cloudflare'
      - '--certificatesResolvers.cloudflare.acme.dnschallenge.delaybeforecheck=0s'
      - '--certificatesResolvers.letsencrypt.acme.dnschallenge.resolvers=1.1.1.1:53,1.0.0.1:53'
      - '--certificatesResolvers.letsencrypt.acme.storage=/traefik/acme.json'
      - '[email protected]'
      - '--certificatesResolvers.letsencrypt.acme.caServer=https://acme-staging-v02.api.letsencrypt.org/directory' #letsencrypt staging server
      - '--api.insecure=false'
      - '--providers.docker=true'
      - '--providers.docker.exposedbydefault=false'
    labels:
      - traefik.enable=true
      - traefik.http.routers.traefik.entrypoints=http
      - traefik.http.routers.traefik.service=api@internal
      - traefik.http.routers.traefik.tls.certresolver=cloudflare
      - traefik.http.routers.traefik.tls.domains[0].main=local.bytiful123.com
      - traefik.http.routers.traefik.tls.domains[0].sans=*.local.bytiful123.com
      - traefik.http.services.traefik.loadbalancer.server.port=8080
      - traefik.http.middlewares.redirect-to-https.redirectscheme.scheme=https
      - traefik.http.middlewares.gzip.compress=true
      - coolify.managed=true
- coolify.proxy=trueReplace the following values with your own:
CF_DNS_API_TOKEN: Your Cloudflare API token, used for DNS challenges. Keep this secure!certificatesResolvers.letsencrypt: This section configures Traefik to use the Cloudflare resolver.provider=cloudflare: Specifies that we’re using Cloudflare as our ACME provider.email[email protected]: Your email address for Let’s Encrypt notifications (even though we’re using Cloudflare). Replace with your actual email.
traefik.http.routers.traefik.tls.domains: Defines the domains that Traefik will serve HTTPS for, including a wildcard subdomain (*.local.bytiful123.com)- You must own that domain, otherwise it will not work
Explanation of changes:
delaybeforecheck=0s: Sets a delay before checking certificate status (important for DNS propagation).resolvers=1.1.1.1:53,1.0.0.1:53: Specifies public DNS resolvers to use when verifying the challenge. Should work independently of the provider you usestorage=/traefik/acme.json: Defines where Traefik will store ACME account keys and certificates. In general, you do not need to change this unless you know what you’re doing- certificatesResolvers.cloudflare.acme.dnschallenge.xyz: This changes the default HTTP Challenge used by Coolify to a DNS challenge. In our case, Cloudflare can then verify we own the domain by modifying its DNS using our API key, which is much simpler to manage
- certificatesResolvers.cloudflare.acme.caServer: The configured server is letsencrypt’s staging server. It’s a good idea to use it, otherwise sending too many requests to Cloudflare for certificate generation could lead to your account being blocked from generating certificates, this can last from an hour up to a week, so we only change to the production server (instead of staging) when tests are conclusive
Applying the Configuration:
After saving the changed by clicking on “Save” at the top of the page, restart your Coolify proxy by clicking on “Restart Proxy” in the top-right of the page. Give Coolify 30 seconds or so to fully recreate the containers.
Give Coolify a hostname
On the left of the page, open the “Settings” tab. Under “Configuration” => “Instance Settings” => “Instance’s domain“, change the value to reflect your desired hostname to use with Coolify, for example in our case “https://coolify.local.bytiful.com“
Also configure your timezone and disable DNS Validation if you will be configuring your coolify hostname on a local DNS server.
Restart your Coolify proxy by clicking on “Restart Proxy” in the top-right of the page at “Servers” => “localhost” => “Proxy“. If needed, shutdown then start the container again (if there are errors)

Configure your DNS to point to coolify’s IP
Add an “A” record for your chosen domain (coolify.local.bytiful.com) in your DNS server to point to Coolify’s server’s IP. We highly recommend configuring this record on a local DNS server since, in this case, there is no reason for an external DNS server to point to your local IP.
This is called split DNS, it is possible to configure “A” records pointing to your domain, local.bytiful.com even if your domain is already managed on external DNS servers. Computers using your local DNS server will resolve these hostnames first before looking for external DNS records.
Test the configuration
Open the newly configured URL. Do note that it could take a couple minutes before your certificates are created, downloaded to the server and ready to use.
To make sure your DNS is pointing to the right place, launch a command prompt “cmd.exe” and ping the configured URL (e.g. ping coolify.local.bytiful.com) and make sure you get a reply (assuming your firewall/server isn’t blocking ICMP (ping) requests to the server
It is entirely normal, at this point, to get an HTTPs warning after opening the page. We are temporarily using letsencrypt staging servers which are for development and testing purposes
Change caServer from staging to production
Go back to the following page on the Coolify server [“Servers” tab on the left => click on “localhost” => “Proxy“] then modify the following line from:
certificatesResolvers.cloudflare.acme.caServer=https://acme-staging-v02.api.letsencrypt.org/directory' # stagingTo
certificatesResolvers.cloudflare.acme.caServer=https://acme-v02.api.letsencrypt.org/directory' # ProductionThen click “Restart Proxy” in the top right of the page.
After a couple minutes, you should be able to access your Coolify server on the previously configured URL without getting an HTTPs warning
If you still get an HTTPs warning
If you still get an HTTPs warning when opening the previously configured Coolify URL, there are a couple things you can try:
- Just wait
- Wait 5-10 minutes to make sure the certificates have time to get changed and for everything to stabilize
- Clear your browser’s cache
- For example, for google Chrome, simply open the following URL, select the last 24 hours and select to clear your cookies and cache data. Everything else can be left unchecked
- chrome://settings/clearBrowserData
- For example, for google Chrome, simply open the following URL, select the last 24 hours and select to clear your cookies and cache data. Everything else can be left unchecked
- Reset the acme.json file
- This file contains the certificate information that Traefik (the reverse proxy used by Coolify) uses to create services and serve them behind HTTPs
- 1. Connect to your server through SSH
- 2. Connect to the “root” account (if not done already)
- On Ubuntu or Debian, this can be done using the command “
sudo su - root” using your administrator account
- On Ubuntu or Debian, this can be done using the command “
- 3. Navigate to Coolify’s folder
- Navigate to “
cd /data/coolify/proxy“
- Navigate to “
- 4. Delete the acme.json file
- Run the command “
rm acme.json” to remove the file
- Run the command “
- 5. Restart your proxy
- Access your Coolify server’s web page using its IP address (http://ip-of-server:8000/) and restart the proxy under “Servers” => “localhost” => “Proxy” => “Restart Proxy“
- 6. Your configured URL should be accessible in around a minute, you can make sure that Traefik was able to fetch certificates by inspecting the contents of the acme.json file
- Run the command “
cat acme.json“ - The file should contain your certificates which are long strings of text stored in values named “certificate“. These might not appear right away, give it a minute or two. Otherwise, check Traefik logs on the Coolify server’s “Proxy” page, under the “Logs” tab on the left
- Run the command “
- This file contains the certificate information that Traefik (the reverse proxy used by Coolify) uses to create services and serve them behind HTTPs
Change default wildcard
Changing the default wildcard used by Coolify means your containers with automatically get created with an FQDN (URL/Link) that matches your configured domain. For example, configuring the wildcard as domain.com means any service will be created as <name-of-service>.domain.com
This can be changed under “Servers” => “Configuration” => “General” => “Wildcard Domain“, configure your main domain name, for example: “https://local.yourdomain.com”
Deploying a service
- Assuming you have followed the first launch instructions when creating your coolify admin account, you should have a first project pre-created. Navigate to “Projects” => “My First Project” (or create a new one).
- On this page, click “Add New Resource“
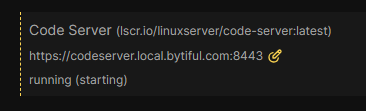
- Choose a service you would like to deploy, it can be anything, for example, we’ll choose the service named “Code Server” by clicking on its tile
- Change the name of the service and the link so that it matches the URL you want to use to connect to said service, then click “Deploy” on the top right and wait until all containers are started (The yellow wheel at the top of the page should disappear)

- In your local DNS, add an “A” record for the newly created domain name (in this case, codeserver.local.bytiful.com” pointing to your Coolify’s server IP, then ping the newly created domain name to confirm it is pointing to your server’s IP
Wait until the service is fully started before trying to connect to it, its state should show “Healthy”, which means it’s fully started and ready to use. Coolify automatically configures the URL through the Traefik Proxy which allows us to access it behind HTTPs
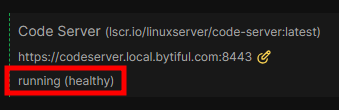
You can then connect to the service through the configured URL
Do note, many services have custom variables that are pre-built into the coolify containers, this code server container requires that a password be setup before launching it, which is handled automatically by Coolify. After accessing the link, the following password will be requested. All containers are different and some may require you to set those variables manually, so keep this in mind.

Important Considerations & Troubleshooting:
- DNS Propagation: Ensure your domain’s DNS records are correctly pointing to your server’s IP address before attempting to access the Coolify dashboard or deploy applications.
- Cloudflare API Token Permissions: The Cloudflare API token needs permissions to manage DNS records for your domain.
- Firewall Rules: Make sure your firewall allows traffic on ports 8000, 80 and 443 to the server hosting Coolify.
- Traefik Logs: If you encounter issues, check the Traefik logs for more detailed error messages. See the “Logs” tab under “Servers” => “localhost” => “Proxy“
- ACME Provider Documentation: Refer to the official Traefik documentation for a complete list of resolvers and their required variables.