We’ll walk you through the process of moving the /tmp, /var, and /home directories back to the root (/) directory on a Debian system where they were intially setup to be on separate partitions. This guide is designed for beginners, so we’ll explain each step in detail to ensure you understand the purpose and process.
This tutorial assumes the storage isn’t configured as an LVM (Logical Volume Manager).
Why Move /tmp, /var, and /home Back to the Root Directory?
Before we dive into the steps, let’s address the “why” behind this process. On some systems, these directories might be on separate partitions for performance, security, or organizational reasons. However, there are scenarios where consolidating them back to the root partition can simplify management, improve disk space utilization, or resolve issues related to partition sizes.
Steps to Move /tmp, /var, and /home Back to the Root Directory
1. Note Down All Partitions
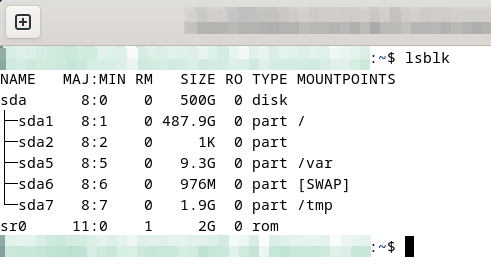
First, identify all the partitions on your system using the lsblk command. It lists all block devices, helping you note down the partition names (e.g., sda1, sda2).:
lsblkIn this case (as visible in the capture below), our main partition “/” is located on sda1, our /var partition is located on sda5 and so on. (The home partition has already been moved and is not visible on this capture, but the steps outlined below include instructions on moving it.
2. Take Backups
Before making any changes, it’s crucial to back up your data. At a minimum, back up the /tmp, /var, and /home directories. Ideally, take a snapshot of your VM or a full backup of your physical server.
3. Boot into a Linux Live CD
To make changes safely, boot into a Linux Live CD. In this tutorial, we’ll use the GParted Live CD.
- Download the LiveCD ISO from the official GParted website by downloading the latest amd64.iso file
- If using a virtual machine, boot the VM from the GParted ISO file that was downloaded, for a desktop or physical server you will need to burn the ISO to a USB drive (recommended) or DVD. There are many ways of doing this and we simply recommend Googling “Create linux bootable usb from ISO” or similar for the most up-to-date steps.
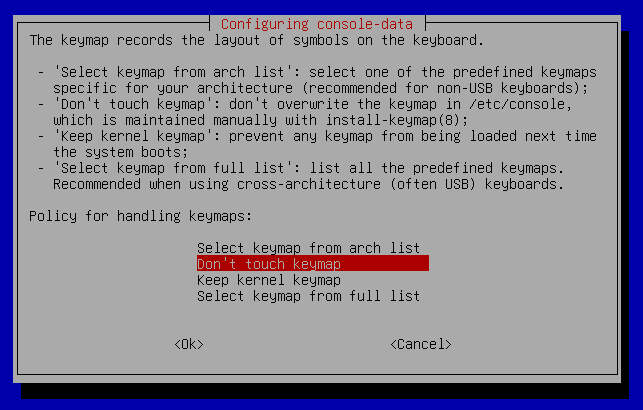
- After starting the GParted ISO, you will need to get to the console. At the time of writing, the steps to follow were:
- Choose “Don’t touch keymap” under the “Configuration console-data” screen
- Choose a language by typing its ID and pressing Enter (in this case, we choose US English (33)
- Choose to enter “command line prompt” mode

4. Mount All Partitions
Once booted into the Live CD, mount all the partitions identified in step 1, there should be 4 (for root, home, tmp and var).
First, create mount points for the directories by entering the /mnt directory and creating 4 folders, one for the root partition, and one for each partition we want to move back to the root:
cd /mnt
mkdir root var tmp home
Mount the root partition (e.g., /dev/sda1)
REMEMBER to change /sdax to the parition number you got in step 1 for the root partition. In this case, we would type “/dev/sda1“
sudo mount /dev/sdax /mnt/rootNavigate to the root directory that you just mounted, then list the files. You should now see the files of your original Debian operating system:
cd /mnt/root
ls -al
Mount the other partitions in the same way to be able to access the files:
sudo mount /dev/sda2 /mnt/var
sudo mount /dev/sda3 /mnt/tmp
sudo mount /dev/sda4 /mnt/home
5. Create Backups of /var, /home, and /tmp
Create backups of the directories on the original Debian system.
To verify if those folders exist, simply run the following commands to enter the original OS’s root directory and list the files, then look for the “home“, “var” and “tmp” folders. Skip those which do not exist.
cd /mnt/root
ls -al
Backup the existing directories on the original Debian filesystem:
sudo mv /mnt/root/var /mnt/root/var_backup
sudo mv /mnt/root/tmp /mnt/root/tmp_backup
sudo mv /mnt/root/home /mnt/root/home_backup
6. Copy Data Back to the Root Partition
Create empty directories for “var, tmp and home” in the original OS’s root directory, then copy all data from the separate partitions back to the original root partition:
cd /mnt/root
sudo mkdir var tmp home
sudo cp -a /mnt/var/. /mnt/root/var/
sudo cp -a /mnt/tmp/. /mnt/root/tmp/
sudo cp -a /mnt/home/. /mnt/root/home/
The -a option combined with the “/.” at the end ensures that all files, including hidden ones, are copied with their attributes preserved. This can be very useful (and sometimes necessary) if some configuration files or hidden files are required for a piece of software to function.
7. Update /etc/fstab
Edit the fstab file to disable the separate partitions:
sudo nano /mnt/root/etc/fstabComment out the lines related to /tmp, /home, and /var by adding an # at the beginning of each line. This will set these directories back to their default locations on the root partition.
For example:
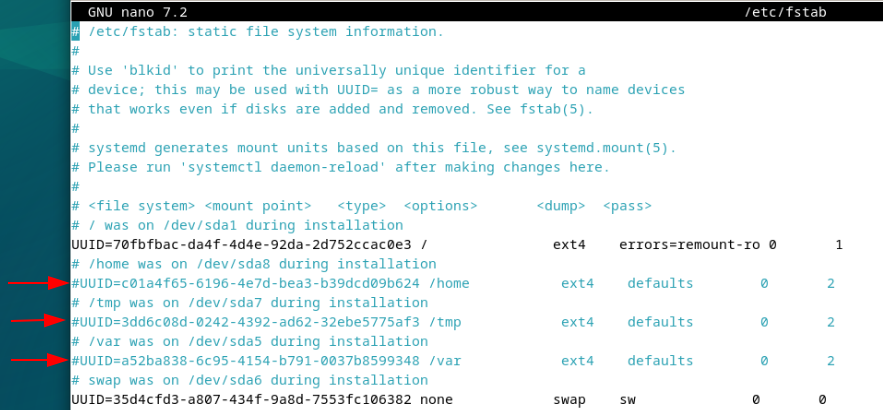
Save and exit nano by using CTRL + X, followed by “y” to save the new file, followed by “Enter” to save and exit
8. Unmount the Partitions
Unmount the partitions:
sudo umount /mnt/root
sudo umount /mnt/var
sudo umount /mnt/tmp
sudo umount /mnt/home
9. Reboot
Reboot your system by shutting down the virtual machine and restarting it or by pressing the physical server’s power button
10. Verify the Changes
After rebooting, verify that /var, /tmp, and /home are now part of the root filesystem. Check if services that rely on these directories (e.g., web servers, Docker) are running as expected.
df -hThis command will show you the current disk usage and confirm that the directories are on the root partition.
By following these steps, you can successfully move /tmp, /var, and /home back to the root directory on your Debian system. This process can help simplify system management and resolve partition-related issues. If you encounter any problems or have questions, feel free to ask for help!